这篇笔记主要介绍 Flink 任务使用 Application Mode 提交到 K8S 集群的流程,使用 flink 1.12 版本说明。
Flink 任务的启动流程,简言之分为三步:
- 提交任务:不同 Mode(Application/PerJob/Session)的区别主要是用户代码是否在这一步执行.
- 启动 JobManager: 跟 Resource Provider(YARN/K8S)申请资源、运行用户代码、初始化 TM 等。
- 启动 TaskManager:执行 JM 指定的具体算子,与 JM 保持心跳。
由于这些开源项目代码变动很快,因此我尽量从 why 的角度,同时忽略代码间类调用的细节,通过一些重点代码介绍。
1. 提交
无论是 PerJob 还是 Application 模式提交到 YARN/K8S,都是通过 bin/flink 脚本,该脚本的入口类即org.apache.flink.client.cli.CliFrontend.
main 首先调用logEnvironmentInfo打印当前用户、JVM内存、hadoop等信息,该方法在 JM TM 启动时都会调用,以输出当前的基础信息。
然后调用parseAndRun方法解析参数,run 对应 PerJob ,本地生成StreamGraph JobGraph,提交到资源调度中心。
run-application 对应 Application,用户main在 JobManager 执行。因此本地流程非常简单,仅调用runApplication方法部署。
public class CliFrontend {
    //...
    protected void runApplication(String[] args) throws Exception {
        //...
        final ApplicationDeployer deployer =
                new ApplicationClusterDeployer(clusterClientServiceLoader);

        final ApplicationConfiguration applicationConfiguration =
                new ApplicationConfiguration(
                        programOptions.getProgramArgs(), programOptions.getEntryPointClassName());
        deployer.run(effectiveConfiguration, applicationConfiguration);
    }
}
ApplicationClusterDeployer将参数转化到configuration,举几个常见的例子:
| 参数 | configuration | 解释 |
|---|---|---|
| -C | pipeline.classpaths | classpath |
| -c | $internal.application.main | 用户代码入口类 |
| -D | key=value | 用户指定flink conf |
| 末尾文件 | pipeline.jars | 用户代码入口jar |
| 末尾参数 | $internal.application.program-args | 用户代码入口类参数 |
ApplicationClusterDeployer.run调用clusterDescriptor.deployApplicationCluster.
clusterDescriptor由不同的ClusterClientFactory创建,这里实际创建的子类对象是KubernetesClusterDescriptor.Flink 里大量使用了 factory 模式,比如不同的 Resource-Provider-Client(YARN/K8S/Standalone)。
Flink在官方文档里,ApplicationMode 不支持用户传入外部文件,只能使用镜像里的 jar.3在 KubernetesUtils.checkJarFileForApplicationMode 这一步的提交检查里会给出提示。这点我觉得对于从 Yarn 迁移到 K8S 的用户是很不方便的,有用户提过issue-and-pr4,在高版本里得到了解决。
KubernetesClusterDescriptor.deployClusterInternal构造 JobManager 的 Specification,通过fabric8io/kubernetes-client1提交到对应的 K8S 集群。
Specification 里指定了 JobManager 的入口类:
kubernetes.internal.jobmanager.entrypoint.class: KubernetesApplicationClusterEntrypoint
2. 运行 JobManager
JM Pod 的启动脚本是 /docker-entrypoint.sh,运行KubernetesApplicationClusterEntrypoint方法。
查看该方法的实现前,不妨先想想 JM 提供了哪些功能:
- 任务启动:生成/运行 JobGraph,
- 资源处理:跟 Resource Provider 打交道,申请资源、初始化 TM 的 Container/Pod 等
- 任务运行:TM 的心跳检测、Checkpoint 的协调和管理
- 任务监控:提供 Rest Endpoint,支持通过 WebUI 查看 flink 任务
public final class KubernetesApplicationClusterEntrypoint extends ApplicationClusterEntryPoint {
    public static void main(final String[] args) {
        PackagedProgram program = null;
        try {
            program = getPackagedProgram(configuration);
        } catch (Exception e) {
            LOG.error("Could not create application program.", e);
            System.exit(1);
        }
        // ...
        final KubernetesApplicationClusterEntrypoint kubernetesApplicationClusterEntrypoint =
                new KubernetesApplicationClusterEntrypoint(configuration, program);

        ClusterEntrypoint.runClusterEntrypoint(kubernetesApplicationClusterEntrypoint);
    }
}
- 获取
PackagedProgram:封装了用户代码相关,例如入口类、参数、用户 jar、classpath 等 runClusterEntrypoint调用runCluster:启动 JobManager,包含各类 Server,运行用户代码,同时申请 TaskManager 资源以及初始化
2.1. PackagedProgram
public class PackagedProgram {
    private final URL jarFile;
    private final String[] args;
    private final Class<?> mainClass;
    private final List<File> extractedTempLibraries;
    private final List<URL> classpaths;
    private final ClassLoader userCodeClassLoader;

    public void invokeInteractiveModeForExecution() throws ProgramInvocationException {
        callMainMethod(mainClass, args);
    }

    private static void callMainMethod(Class<?> entryClass, String[] args)
            throws ProgramInvocationException {
        Method mainMethod;

        mainMethod = entryClass.getMethod("main", String[].class);

        mainMethod.invoke(null, (Object) args);
    }
}
Per-Job Mode,PackagedProgram是在 client 端生成的。 Application Mode,PackagedProgram在 JM 生成。
invokeInteractiveModeForExecution即调用用户的入口类 main 方法。
2.2. runClusterEntrypoint
public abstract class ClusterEntrypoint implements AutoCloseableAsync, FatalErrorHandler {
    private void runCluster(Configuration configuration, PluginManager pluginManager)
            throws Exception {
        // 启动 commonRpcService(akka)、haServices、
        // blobServer(存储例如 JobGraph 里的 jar 包,能够被 JobManager、TaskManager 访问)、
        // heartbeatServices、metricRegistry(metrics reporter初始化)
        // 端口号占用:blobServer、akka*2、rest
        initializeServices(...)
        // 创建 dispatcher resource-manager 等组件
        clusterComponent = dispatcherResourceManagerComponentFactory.create
    }
}
create主要做了3件事情:
- 创建 webMonitorEndpoint,提供 Restful API 响应
- 创建 ResourceManager,负责跟 RP(YARN/K8S) 申请资源、管理及释放
- 创建 DispatcherRunner,负责启动 Dispatcher,该类提供了
submitJob(JobGraph jobGraph, Time timeout)负责作业的启动和分发
public class DefaultDispatcherResourceManagerComponentFactory
        implements DispatcherResourceManagerComponentFactory {
    // 三大组件工厂类
    @Nonnull private final DispatcherRunnerFactory dispatcherRunnerFactory;
    @Nonnull private final ResourceManagerFactory<?> resourceManagerFactory;
    @Nonnull private final RestEndpointFactory<?> restEndpointFactory;

    public DispatcherResourceManagerComponent create(...) {
        // 创建 jobmaster.MiniDispatcherRestEndpoint 用于提供 Restful 响应,启动
        webMonitorEndpoint = restEndpointFactory.createRestEndpoint(...)
        webMonitorEndpoint.start();

        //这里 factory 类型为 KubernetesResourceManagerFactory ,创建对应的 ResourceManager<?>
        resourceManager = resourceManagerFactory.createResourceManager(...)

        // 创建 dispatcherRunner, 打印日志:Starting Dispatcher.
        dispatcherRunner = dispatcherRunnerFactory.createDispatcherRunner(...)

        // 启动 resourceManager, 打印日志:Starting ResourceManager.
        // RpcEndpoint.start 后会调用 ResourceManager.onStart
        resourceManager.start()
        return DispatcherResourceManagerComponent(..)
    }
}
RestEndpoint 不难理解,重点介绍下 ResourceManager 和 Dispatcher.
由于 Flink 支持多种 HA(ZK/Kubernetes),因此 ResourceManager 和 Dispatcher 都需要先获取 Leadership 再具体工作。
public abstract class ResourceManager<WorkerType extends ResourceIDRetrievable>
        extends FencedRpcEndpoint<ResourceManagerId>
        implements ResourceManagerGateway, LeaderContender {
    @Override
    public void grantLeadership(final UUID newLeaderSessionID) {
        // ...
    }
}

public final class DefaultDispatcherRunner implements DispatcherRunner, LeaderContender {
    @Override
    public void grantLeadership(UUID leaderSessionID) {
        // ...
    }
}
对于 ResourceManager,grantLeadership主要做两件事情:
- startHeartbeatServices: 开启 jm tm 心跳
- slotManager.start: 申请 TaskManager 资源
注:
- SlotManager JobLeaderIdService 是在 class ResourceManagerRuntimeServices 管理的。
- LeaderElectionDriver 有两个子类 ZooKeeperLeaderElectionDriver KubernetesLeaderElectionDriver,对应 HA 的两种实现。
Dispatcher 的封装比较复杂,封装的层次很深,各类 Driver Factory Gateway 的类命名层出不穷。
核心的调用链路终点统一到PackagedProgram.invokeInteractiveModeForExecution:
class DefaultDispatcherRunner                       grantLeadership
                                                      │
                                                      ▼
                                                    startNewDispatcherLeaderProcess
                                                      │
                                                      ▼
class DispatcherLeaderProcess                       start
                                                      │
                                                      ▼
class SessionDispatcherLeaderProcess                onStart
                                                      │
                                                      ▼
                                                    createDispatcherIfRunning
                                                      │
                                                      ▼
                                                    createDispatcher
                                                      │
                                                      ▼
class ApplicationDispatcherGatewayServiceFactory    create
                                                      │
                                                      ▼
                                                    new ApplicationDispatcherBootstrap
                                                      │
                                                      ▼
                                                    ClientUtils.executeProgram
                                                      │
                                                      ▼
                                                    progam.invokeInteractiveModeForExecution
如在更早的笔记里介绍的,用户的代码都是声明式的,执行过程是:
map/reduce/filter/... -> transformation -> stream graph -> job graph
然后提交生成的JobGraph结构:
public class EmbeddedExecutor implements PipelineExecutor {
    private CompletableFuture<JobClient> submitAndGetJobClientFuture(...) {
        final JobGraph jobGraph = PipelineExecutorUtils.getJobGraph(pipeline, configuration);
        final JobID actualJobId = jobGraph.getJobID();

        // ...
        final CompletableFuture<JobID> jobSubmissionFuture =
                submitJob(configuration, dispatcherGateway, jobGraph, timeout);
    }
}
提交之后,就回到了Dispatcher最重要的一个方法submitJob(JobGraph jobGraph, Time timeout)了。
不同提交方式有不同的实现,DispatcherGateway统一定义了接口:
public interface DispatcherGateway extends FencedRpcGateway<DispatcherId>, RestfulGateway {
    CompletableFuture<Acknowledge> submitJob(JobGraph jobGraph, @RpcTimeout Time timeout);
    CompletableFuture<Collection<JobID>> listJobs(@RpcTimeout Time timeout);
    CompletableFuture<Integer> getBlobServerPort(@RpcTimeout Time timeout);
    CompletableFuture<ArchivedExecutionGraph> requestJob(JobID jobId, @RpcTimeout Time timeout);
    default CompletableFuture<Acknowledge> shutDownCluster(ApplicationStatus applicationStatus) {
        return shutDownCluster();
    }
}
submitJob启动JobManagerRunnerImpl
public class JobManagerRunnerImpl
        implements LeaderContender, OnCompletionActions, JobManagerRunner {
    private final JobMasterService jobMasterService; // JobMaster -> JobMasterService

    public JobManagerRunnerImpl() {
        this.jobMasterService =
                jobMasterFactory.createJobMasterService(
                        jobGraph, this, userCodeLoader, initializationTimestamp);
        jobMasterCreationFuture.complete(null);
    }

    public void grantLeadership(final UUID leaderSessionID) {
        jobMasterCreationFuture.whenComplete(...)
    }
}
jobMasterService.start里开始调度任务 DAG,主要实现是在
public class JobMaster extends FencedRpcEndpoint<JobMasterId>
        implements JobMasterGateway, JobMasterService {
    private final JobGraph jobGraph;
    private SchedulerNG schedulerNG;
    // ...
}
public abstract class SchedulerBase implements SchedulerNG {
    private final JobGraph jobGraph;

    private final ExecutionGraph executionGraph;

    private final SchedulingTopology schedulingTopology;
}
也就是在这里,JobGraph 转换为真正可以执行的 ExecutionGraph,JobMaster 以此将 DAG 调度到不同的 TaskManager 上。
3. 运行 TaskManager
JobManager 的SlotManagerImpl.start方法里,会调用ActiveResourceManager.requestNewWork,进而使用对应的ResourceManagerDriver启动 TaskManager.
对于 K8S 环境,/docker-entrypoint.sh 的入口类是KubernetesTaskExecutorRunner
public class JavaCmdTaskManagerDecorator extends AbstractKubernetesStepDecorator {
    private String getTaskManagerStartCommand() {

        // ...
        return getTaskManagerStartCommand(
                kubernetesTaskManagerParameters.getFlinkConfiguration(),
                kubernetesTaskManagerParameters.getContaineredTaskManagerParameters(),
                confDirInPod,
                logDirInPod,
                kubernetesTaskManagerParameters.hasLogback(),
                kubernetesTaskManagerParameters.hasLog4j(),
                KubernetesTaskExecutorRunner.class.getCanonicalName(),
                mainClassArgs);
    }
}
对 TaskManager,核心功能有:
- 接收 JobManager 分配的任务算子,执行
- 保持跟 JobManager 的心跳,汇报当前状态
重点看下执行算子这部分,FLIP-62里的图描述了这个交互过程:
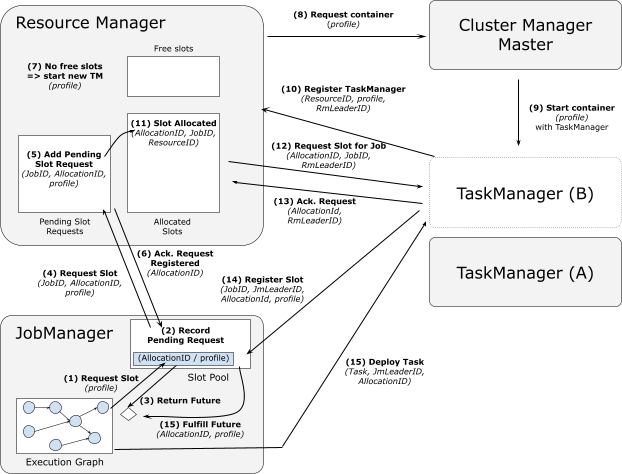
TaskManagerRunner负责启动 akka system、metrics reporter、blobCacheService 等服务,同时启动TaskExecutor,整个交互流程的核心逻辑也都通过该类实现。
- 连接 ResourceManager,注册自身
TaskExecutorRegistration:connectToResourceManager - 连接成功后,发送 SlotReport 到 RM 汇报 slot 情况:
establishResourceManagerConnection - RM 收到请求后,在 class SlotManagerImpl 的方法里 RPC 调用 gateway.requestSlot
- TM 在 requestSlot 方法里,连接 JobMaster,发送 SlotOffer 到 JM:
registerNewJobAndCreateServices - JM 收到 SlotOffer 后,调用
taskManagerGateway.submitTask(deployment)给 TM 分配任务 - TM 在 submitTask 方法里,解析出 JobInformation TaskInformation,比如这里的入口类可能是
org.apache.flink.streaming.runtime.tasks.SourceStreamTask,创建Task对象,启动工作线程task.startTaskThread
至此,TaskManager 开始执行用户代码的实现。
注:RpcTaskManagerGateway在 RPC 的接口实现里,基本都是调用TaskExecutor的方法,典型的方法:
- 资源管理: requestSlot、freeSlot
- 任务管理: submitTask、cancelTask、requestStackTraceSample
- Checkpoint: triggerCheckpoint、confirmCheckpoint
- 连接: heartbeatFromJobManager、heartbeatFromResourceManager
4. 总结
JobManager TaskManager 是典型的 Master-Worker 架构,进程入口类固定。
启动了多个服务,用于支持任务提交、Rest接口、文件服务、metrics监控等等。用户的代码,在经过 transformation -> stream graph -> job graph -> execute graph 的多次转换后,包装成了不同算子的逻辑实现部分。
JobManager 负责跟 Resource Provider 申请资源,分配给 TaskManager 执行,这里通过多次 RPC 交互完成。JobManager 同时负责执行过程中的协调、容错、资源回收等。
Flink 使用 Fabric8 跟 Kubernetes 集群交互创建 JobManager TaskManager,相关代码分析在Flink - fabric8 的使用