上篇文章介绍了protobuf里整型的编码方式,这篇文章从整体上介绍下pb的编码规则,包括string/bytes/float/double/message等类型的序列化实例以及源码,最后分析下pb向前兼容这个特性的一些细节。
1. message数据格式
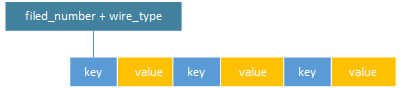
pbmessage序列化以二进制流的方式存储,按照定义的字段顺序紧紧相邻。每个字段对应有key-value数据相邻,key由field_number和wire_type计算出,value由该字段定义的值(可能包括value长度)组成。
2. 相关类图
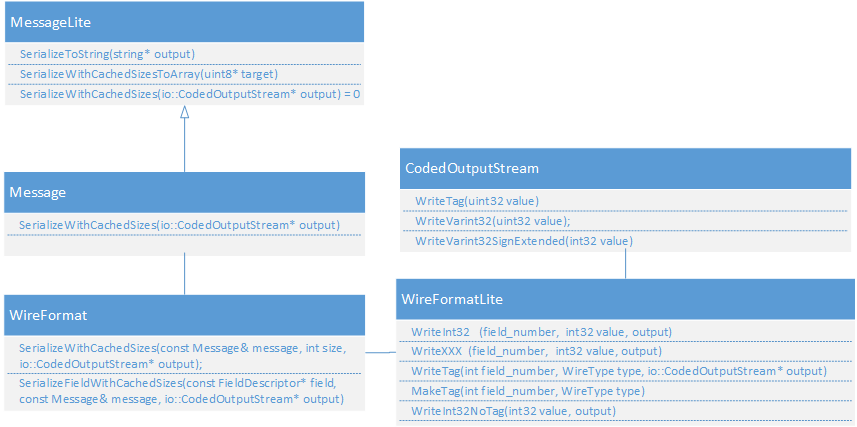
Message::SerializeToString负责序列化message,调用到WireFormat的这个接口
  static void SerializeWithCachedSizes(
      const Message& message,
      int size, io::CodedOutputStream* output);
SerializeWithCachedSizes首先通过Reflection::ListFields获取所有的字段,然后逐个字段通过这个接口计算每个字段序列化后的值,可以看到这里传入的参数是字段描述符(FieldDescriptor)。
  // Serialize a single field.
  static void SerializeFieldWithCachedSizes(
      const FieldDescriptor* field,        // Cannot be NULL
      const Message& message,
      io::CodedOutputStream* output);
该函数会对extension/repeated/packed做判断,之后调用WireFormatLite的一系列接口完成各字段的序列化,调用的接口根据类型决定,例如:
  // Write fields, including tags.
  static void WriteInt32   (field_number,  int32 value, output);
  static void WriteInt64   (field_number,  int64 value, output);
  static void WriteSInt32  (field_number,  int32 value, output);
  static void WriteEnum    (field_number,    int value, output);
  static void WriteString(field_number, const string& value, output);
  static void WriteMessage(
    field_number, const MessageLite& value, output);
  ...
接下来介绍下各种类型的序列化过程,也就是上面函数的实现过程。 每个字段的key的序列化是一致的,先统一介绍下。
3. key的序列化
3.1 规则
key的序列化使用了varint编码,在上一节也简单介绍了下。
序列化的公式为varint(field_number << 3 | wire_type),field_number为proto定义里的序列号,wire_type指定了编码方式,不同类型的数据可能不一样。
3.2 源码解析
实现上先写key,再写value。比如调用WriteInt32写入一个int32类型的key-value时:
void WireFormatLite::WriteInt32(int field_number, int32 value,
                                io::CodedOutputStream* output) {
  WriteTag(field_number, WIRETYPE_VARINT, output);//写key
  WriteInt32NoTag(value, output);//写value
}
WriteTag即写入key序列化后的值
函数原型为:WriteTag(field_number, WireType type, output)
其中第一个参数为field_number,即为proto定义的序列号。
第二个参数为wire_type,不同类型的对应参数可能不同,比如WriteFixed32(固定占用4个字节)时的参数为WIRETYPE_FIXED32。
继续分析下WriteTag这个函数,非常简单,只有一句output->WriteTag(MakeTag(field_number, type));。包含了两个动作,一个是MakeTag构造tag,一个是通过CodedOutputStream::WriteTag写入。
MakeTag通过调用宏GOOGLE_PROTOBUF_WIRE_FORMAT_MAKE_TAG完成
具体宏定义如下,也就是我们介绍的规则field\_number << 3 | wire_type
#define GOOGLE_PROTOBUF_WIRE_FORMAT_MAKE_TAG(FIELD_NUMBER, TYPE)                  \
  static_cast<uint32>(                                                   \
    ((FIELD_NUMBER) << ::google::protobuf::internal::WireFormatLite::kTagTypeBits) \
      | (TYPE))
CodedOutputStream::WriteTag的实现非常简单,直接调用的WriteVarint32
inline void CodedOutputStream::WriteTag(uint32 value) {
  WriteVarint32(value);
}
注意跟直接调用WriteVarint32的区别在于inline。
整型字段的序列化上篇文章介绍过了,接下来逐个介绍下其他类型的序列化过程。
4. string/bytes的序列化
4.1 规则
先看一个例子,定义proto optional string a = 1;,然后赋值test.set_a("teststring");。
查看序列化后的值为0a0a 7465 7374 7374 7269 6e67。
对string/bytes类型,假设写入的字符串为value,序列化后的值简单讲就是key + varint(value.size) + value
编码key时的wiretype = 2,因此key编码后的数据为varint(1 << 3 | 2),即0x0a
value的编码规则是,先记录varint(value.size(),然后是value本身。
比如’teststring’一共是10个字节,varint编码后的值为0x0a
value本身对应的字节为7465 7374 7374 7269 6e67,可以得到前面序列化后值了
4.2 源码解析
序列化一个String/Bytes类型使用WriteString/WriteBytes写入的。
void WireFormatLite::WriteString(int field_number, const string& value,
                                 io::CodedOutputStream* output) {
  // String is for UTF-8 text only
  WriteTag(field_number, WIRETYPE_LENGTH_DELIMITED, output);
  GOOGLE_CHECK(value.size() <= kint32max);
  output->WriteVarint32(value.size());
  output->WriteString(value);
}
注意WriteTag的type类型传入的是WIRETYPE_LENGTH_DELIMITED,对应的值为2,表示变长类型。
WriteVarint32出现次数很多就不介绍了
CodedOutputStream::WriteString(const string& str)是调用memcpy写入value的值。
bytes类型调用WriteBytes,实现上跟WriteString一致。
5. float/double的序列化
5.1 规则
float/double比较简单,就是key + value,key里使用的type为WIRETYPE_FIXED32 = 5。
比如定义了optional float a = 1;,赋值test.set_a(1.2345);,序列化后的值为0d19 049e 3f。
其中0d是key编码后的值,即varint(1 << 3 | 5) = 0x0d,19 04 9e 3f是1.2345对应的内存数据。
5.2 源码解析
float/double的写入比较类似,这里以WriteFloat为例介绍下
void WireFormatLite::WriteFloat(int field_number, float value,
                                io::CodedOutputStream* output) {
  WriteTag(field_number, WIRETYPE_FIXED32, output);
  WriteFloatNoTag(value, output);
}
注意WriteTag的type参数为WIRETYPE_FIXED32
WriteFloatNoTag的实现只有一句output->WriteLittleEndian32(EncodeFloat(value));
也是由两个函数调用组成
EncodeFloat转化float到对应的int32
inline uint32 WireFormatLite::EncodeFloat(float value) {
  union {float f; uint32 i;};
  f = value;
  return i;
}
CodedOutputStream::WriteLittleEndian32(uint32 value)写入一个uint32的little-endian值。
6. message的序列化
message序列化跟string很像
void WireFormatLite::WriteMessage(int field_number,
                                  const MessageLite& value,
                                  io::CodedOutputStream* output) {
  WriteTag(field_number, WIRETYPE_LENGTH_DELIMITED, output);
  const int size = value.GetCachedSize();
  output->WriteVarint32(size);
  value.SerializeWithCachedSizes(output);
}
比如定义了message
message Test1 {
    message Test2 {
        optional float a = 1;
    }
    optional Test2 a = 1;
}
对Test2类型,沿用上一节float类型的例子赋值
    Test1 test;
    test.mutable_a()->set_a(1.2345);
从上一节可以知道test.a序列化后的值为0d19 049e 3f,序列化之后的内容为0a05 0d19 049e 3f,其中0a是key编码后的内容,05是value的长度,0d19 049e 3f就是Test2对象序列化后的值。
7. unknown字段的解析和序列化
protobuf的向前兼容一直作为特性之一,比如我们有A B C三个模块,数据格式统一使用proto编码,数据流方向为A -> B -> C,A C模块升级proto后,不仅能够保证B模块可以正确解析A模块序列化后的数据,也能够保证C模块可以解析到新字段的数据。
根据上面的介绍,我们可以推导pb消息的反序列化的过程:
先读取varint格式的key,解析得到tag以及wire_type,根据wire_type推导如何解析value,得到一组{tag:value}数据。
注意在这个过程中,完全没有用到数据对应的proto定义。这也是能够向前兼容的奥秘。当解析到未定义的tag时(实际上是找不到对应的FieldDescriptor,即字段描述符),数据实际上会存放到::google::protobuf::UnknownFieldSet _unknown_fields这个成员变量。
仍旧以前面float的数据举个例子,我们定义了两个message来模拟A->B的数据流,A模块负责写MessageA(序列化),B模块负责读MessageB(反序列化)。
版本1时MessageA跟MessageB结构相同
message MessageA {
    optional float a = 1;
}

message MessageB {
    optional float a = 1;
}
检查此时messageB的_unknown_fields
    MessageA msgA;
    msgA.set_a(1.2345);//set by module A

    std::string data;
    msgA.SerializeToString(&data);//serialize to data

    MessageB msgB;
    msgB.ParseFromString(data);//parse from data
    //check unknown field
    const ::google::protobuf::UnknownFieldSet& unknown_fields = msgB.unknown_fields();
    std::cout << unknown_fields.field_count() << std::endl;
输出为0,表明此时B模块未检测到未知字段。
接下来我们升级A模块的proto到版本二:修改MessageA添加optional stringb = 2;, messageB不变。
修改上面的程序,msgA.set_b("teststring"),此时程序输出1,表明有了1个未知的字段。
更具体的,试着查看_unknown_fileds里的内容
    //check unknown field
    const ::google::protobuf::UnknownFieldSet& unknown_fields = msgB.unknown_fields();

    for (int i = 0; i < unknown_fields.field_count(); ++i) {
        const ::google::protobuf::UnknownField& field = unknown_fields.field(i);//get the unknown filed by index
        std::cout << field.number() << std::endl;//field tag
        std::cout << field.type() << std::endl;//field type
        std::cout << field.length_delimited() << std::endl;//hack:因为我们这里知道未知字段为string类型,而string序列化为变长类型,所以这里直接使用length_delimited这个接口
    }
从输出里我们可以看到number = 2; type = TYPE_LENGTH_DELIMITED; length_delimited = teststring。也就是模块B遇到未知字段时,将数据解析并且存储在了_unknown_fileds。通过遍历,我们可以得到所有位置字段的序列号、wire_type,以及对应的value。当需要发往下游C模块时,重新序列化即可。
如果C模块同样升级到新的proto版本,新增加字段数据不会丢失,通过添加以下代码可以验证下
    msgB.SerializeToString(&data);
    MessageA msgC;
    msgC.ParseFromString(data);
    std::cout << msgC.a() << std::endl;
    std::cout << msgC.b() << std::endl;
注:
实际上在序列化的时候获取_unknown_fileds是通过const GeneratedMessageReflection::UnknownFieldSet& GetUnknownFields(const Message& message) const,该类负责反射,其中获取具体message的_unknown_fields成员变量是通过偏移量来传入的
//test.pb.cc
//Test1为自定义message类型
  Test1_reflection_ =
    new ::google::protobuf::internal::GeneratedMessageReflection(
      ...
      GOOGLE_PROTOBUF_GENERATED_MESSAGE_FIELD_OFFSET(Test1, _unknown_fields_),
      -1,
      ...);

//generated_message_reflection.h
// Note that we calculate relative to the pointer value 16 here since if we
// just use zero, GCC complains about dereferencing a NULL pointer.  We
// choose 16 rather than some other number just in case the compiler would
// be confused by an unaligned pointer.
#define GOOGLE_PROTOBUF_GENERATED_MESSAGE_FIELD_OFFSET(TYPE, FIELD)    \
  static_cast<int>(                                           \
      reinterpret_cast<const char*>(                          \
          &reinterpret_cast<const TYPE*>(16)->FIELD) -        \
      reinterpret_cast<const char*>(16))