之前介绍过bimap用于解决双向map的需求,类似于关系数据库里对多列建立索引。boost里的multi_index_container则继续扩充了这个特性,支持将多种container的接口合并到一块,想象下将std::vector和std::map合并到一个容器里组成一个新的容器,既支持数据的顺序写入,也支持k-v映射。
考虑实际应用场景,例如LRU cache,需要对数据hash和按照时间排序,实现上经常维护两个容器:hash_table和list,更新时保证两个container的一致性。而使用multi_index_container可以构造出同时具有hash_map和list接口的类,用户不需要关注底层的数据实现和一致性。
实际上,multi_index_container可以根据需要组装出各种接口,比如多种index方式,同时支持sequence接口:

这个类2004年就已经由boost推出,将storage和index interfaces解耦开来,个人觉得非常好用,接下来我们介绍下用法。
1. 基本介绍
1.1. 简化例子
先看一个简单的例子,我们构造了一个最基本的multi_index_container
#include <algorithm>
#include <iostream>
#include <string>

#include "boost/multi_index_container.hpp"//boost::multi_index::multi_index_container
#include "boost/multi_index/ordered_index.hpp"//insert

int main() {
    boost::multi_index::multi_index_container<std::string> employees;

    employees.insert("Jeff Dean");
    employees.insert("Google");
    employees.insert("Bidu");
    employees.insert("Markus Heule");
    employees.insert("Vlad Losev");
    employees.insert("Ufo");

    //Bidu
    //Google
    //Jeff Dean
    //Markus Heule
    //Ufo
    //Vlad Losev
    for (const auto& employee : employees) {
        std::cout << employee << std::endl;
    }

    //6
    std::cout << employees.size() << std::endl;
    employees.erase(employees.find("Ufo"));
    //Bidu
    //Google
    //Jeff Dean
    //Markus Heule
    //Vlad Losev
    for (const auto& employee : employees) {
        std::cout << employee << std::endl;
    }

    auto it1 = employees.lower_bound("J");
    auto it2 = employees.upper_bound("N");

    //Jeff Dean
    //Markus Heule
    for (; it1 != it2; ++it1) {
        std::cout << *it1 << std::endl;
    }

    return 0;
}
我们上面定义了multi_index_container<std::string>,可以看到set的接口几乎都支持,比如erase、lower_bound、upper_bounder。
实际上multi_index_container<(element)>等价于
multi_index_container<
  (element),
  indexed_by<
    ordered_unique<identity<(element)> >
  >
>
这应该是最简单的一种multi_index_container,只有一个索引:对employee的name排序。单索引的multi_index_container退化为正常的stl容器std::set,实际场景肯定不会这么使用,因为实测性能上要差一些(性能部分参考笔记)。。
接下来我们考虑复杂一点,假设employee除了记录姓名,还要记录编号,我们除了希望除了对name排序,对编号也能排序,这时候,多索引的multi_index_container就需要登场了。
1.2. Multiple sorts on a single set
扩展Employee为一个struct,包含id + name
struct Employee {
    Employee(int id_, const std::string& name_) :
        id(id_),
        name(name_) {
        }

    int id;//编号
    std::string name;//姓名

    //default compare by id
    bool operator<(const Employee& employee) const {
        return id < employee.id;
    }

    friend std::ostream& operator<<(std::ostream& out, const Employee& employee) {
        out << employee.id << "\t" << employee.name << std::endl;
        return out;
    }
};//Employee
Employee包含id && name,实现了opertor<:按照id排序
接着我们定义多索引的multi_index_container
typedef boost::multi_index::multi_index_container<
        Employee,
        boost::multi_index::indexed_by<
            boost::multi_index::ordered_unique<
                boost::multi_index::identity<Employee> >,
            boost::multi_index::ordered_non_unique<
                boost::multi_index::member<Employee, std::string, &Employee::name> >
            >
        > EmployeeSet;
multi_index_container是一个模板类,指定了几个模板参数
Employee表示容器内的元素类型indexed_by用于组织所有的索引类型,可以有多个索引,例如ordered_uniqueordered_non_unique,称为Index Type,指定对应IndexType后会生成对应container的接口。例如ordered_unique生成std::set接口,而ordered_non_unique生成std::multiset接口。
无论ordered_unique还是ordered_non_unique,都需要比较key来确定索引顺序:例如identity表示直接使用元素本身作为key比较大小(实现operator<),member表示使用某个成员变量作为比较的key,这个提取key的方法称为Key Extraction
Index Type/Key Extraction接下来会详细介绍下,我们继续看EmployeeSet本身。
定义完成后,我们先添加部分数据
    EmployeeSet employees;

    employees.insert({5, "Jeff Dean"});
    employees.insert({1, "Google"});
    employees.insert({3, "Bidu"});
    employees.insert({2, "Markus Heule"});
    employees.insert({4, "Vlad Losev"});
然后看下如何分别根据id/name遍历
首先根据第一个索引(id)遍历
    //1       Google
    //2       Markus Heule
    //3       Bidu
    //4       Vlad Losev
    //5       Jeff Dean
    std::copy(
            employees.begin(), //equal to employees.get<0>()
            employees.end(),
            std::ostream_iterator<Employee>(std::cout));
或者根据第二个索引(name)遍历
    //3       Bidu
    //1       Google
    //5       Jeff Dean
    //2       Markus Heule
    //4       Vlad Losev
    const EmployeeSet::nth_index<1>::type& name_index = employees.get<1>();
    std::copy(
            name_index.begin(),
            name_index.end(),
            std::ostream_iterator<Employee>(std::cout));
注意这里我们引入了get<N>函数,这是一个模板函数,返回对应的N个索引,取值范围为[0, N),例如get<0> get<1>分别返回定义的第一个和第二个索引。
x等价于x.get<0>,也就是默认为第一个索引。
返回类型为x::nth_index<N>::type,在C++11里可以使用auto代替,注意get函数返回的是index的引用,而不是一个index对象,因为脱离container单独构造或者维护一个index对象没有意义。
效果上,可以看到对同一个multi_index_container对象,我们可以分别根据id和name遍历,完整的例子放在了gist上。
2. Index types
上面的例子里,ordered_unique ordered_non_unique都是索引类型,表示对指定的key索引方式为排序。
multi_index_container支持多种索引类型
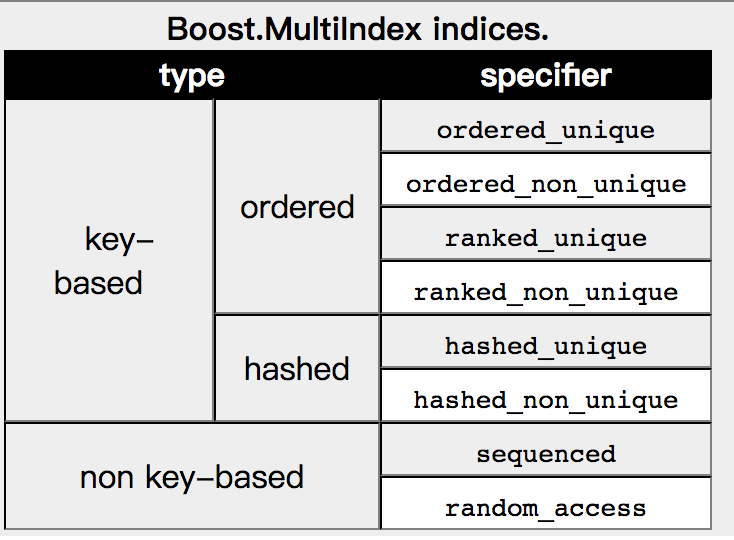
其中key-based需要指定key,提取key的方式,我们在下一节Key Extraction继续介绍。这一节主要介绍下索引的类型。
key-based又分为ordered/hashed两种,分别对应排序和hash两种索引。
non key-based不需要指定key,索引方式类似于std::list std::vector,支持顺序读写、随机读写。
为了说的清楚些,我们看一个Word Count的例子,要求实现以下两个功能:
- 解析输入的文本得到所有单词,统计所有单词出现的个数
- 按照单词出现的个数升序,输出所有的统计结果:单词 出现的个数
分析下,统计单词个数适合使用hash_map,按单词出现的个数遍历适合使用map,于是我们使用multi_index_container组合出一个多索引的容器来。
具体参考代码注释
#include <iostream>
#include <string>
#include <vector>
#include <algorithm>

#include "boost/algorithm/string.hpp"
#include "boost/multi_index_container.hpp"
#include "boost/multi_index/ordered_index.hpp"
#include "boost/multi_index/hashed_index.hpp"
#include "boost/multi_index/identity.hpp"
#include "boost/multi_index/member.hpp"

//WordCnt类,记录了单词及对应的出现个数
struct WordCnt {
    std::string word;
    int cnt;

    WordCnt(const std::string& word_, int cnt_) :
        word(word_),
        cnt(cnt_) {
        }

    //默认按照cnt排序
    bool operator<(const WordCnt& rhs) const {
        return cnt < rhs.cnt;
    }
};//WordCnt

typedef boost::multi_index::multi_index_container<
        //容器内元素类型
        WordCnt,
        boost::multi_index::indexed_by<
            //有序非唯一,顺序参考identtiy<WordCnt>,也就是WordCnt.operator<
            boost::multi_index::ordered_non_unique<
                boost::multi_index::identity<WordCnt> >,
            //无序,也就是hash表,hashkey使用 WorkdCnt::word
            boost::multi_index::hashed_unique<
                boost::multi_index::member<WordCnt, std::string, &WordCnt::word> >
        >
> WordCntContainer;

int main() {
    WordCntContainer word_cnt_container;

    std::vector<std::string> contents;
    //文本 -> 单词vec
    boost::split(contents,
            "hello hello hello hello hello cpp cpp cpp cpp go go go python python shell",
            boost::is_any_of(" "));

    //取第二个索引,也就是hash表
    auto& word_index = word_cnt_container.get<1>();
    for (size_t i = 0; i < contents.size(); ++i) {
        const std::string& word = contents[i];
        auto iter = word_index.find(word);
        //存在则cnt+1,否则插入1
        if (iter == word_index.end()) {
            word_index.insert({word, 1});
        } else {
            word_index.modify(iter, [](WordCnt& word_cnt){ word_cnt.cnt++; });
        }
    }

    //取word_cnt_container,即第一个索引,也就是按照cnt升序排列
    for (const auto word_cnt : word_cnt_container) {
        //shell   1
        //python  2
        //go      3
        //cpp     4
        //hello   5
        std::cout << word_cnt.word << "\t" << word_cnt.cnt << std::endl;
    }

    return 0;
}
我们使用get<1>获得word_index索引用来插入数据,遍历word_cnt_container则获得cnt升序排列的数据。
当然,对于ordered的索引,我们也可以指定排序方式,例如第1个索引可以修改为
            boost::multi_index::ordered_non_unique<
                boost::multi_index::identity<WordCnt> >,
->
            boost::multi_index::ordered_non_unique<
                boost::multi_index::member<WordCnt, int, &WordCnt::cnt>,
                std::greater<int> >,
对应输出为
hello   5
cpp     4
go      3
python  2
shell   1
使用random_access则可以获得类似std::vector按照下标访问的能力,下一节我们会介绍一个相关的例子。
更多索引类型介绍可以参考boost官方文档
3. Key extraction
对需要key的索引,除了制定索引类型例如ordered hashed以外,还需要指定生成key的方式。
上面的例子已经使用过了identity member
3.1. identity
identity指定整个元素作为key,使用element.operator<作为排序方式,例如boost::multi_index::identity<WordCnt>
3.2. member
member指定元素某个成员变量作为key,例如boost::multi_index::member<WordCnt, std::string, &WordCnt::word>。
另外一种指定方式为使用宏
            boost::multi_index::hashed_unique<
                BOOST_MULTI_INDEX_MEMBER(WordCnt, std::string, word) >
实际上BOOST_MULTI_INDEX_MEMBER的定义是这样子的
#define BOOST_MULTI_INDEX_MEMBER(Class,Type,MemberName) \
::boost::multi_index::member_offset< Class,Type,offsetof(Class,MemberName) >
3.3. const_mem_fun and mem_fun
const_mem_fun/mem_fun支持传入成员函数,结合前面提到的random_access看个例子
#include <string>
#include <iostream>

#include "boost/multi_index_container.hpp"
#include "boost/multi_index/random_access_index.hpp"
#include "boost/multi_index/ordered_index.hpp"
#include "boost/multi_index/mem_fun.hpp"

//Employee只有name一个成员函数
//name_length成员函数返回name的长度
struct Employee {
    Employee(const std::string& name_) :
        name(name_) {
        }

    std::size_t name_length() const { return name.size(); }

    std::string name;
};//Employee

typedef boost::multi_index::multi_index_container<
    Employee,
    boost::multi_index::indexed_by<
        //第一个索引使用const_mem_fun定义,fun取Employee::name_length,也就是name的长度
        boost::multi_index::ordered_non_unique<
            boost::multi_index::const_mem_fun<Employee, std::size_t, &Employee::name_length>,
            //降序排列
            std::greater<std::size_t>
        >,
        //支持按照插入顺序随机读写
        boost::multi_index::random_access<>
    >
> EmployeeSet;

int main() {
    EmployeeSet employees;

    employees.insert({"Jeff Dean"});
    employees.insert({"Google"});
    employees.insert({"Bidu"});
    employees.insert({"Markus Heule"});
    employees.insert({"Vlad Losev"});

    //ordered_non_unique按照name长度降序输出
    // Markus Heule
    // Vlad Losev
    // Jeff Dean
    // Google
    // Bidu
    for (const auto employee : employees.get<0>()) {
        std::cout << employee.name << std::endl;
    }

    //random_access按照插入顺序顺序输出
    // Jeff Dean
    // Google
    // Bidu
    // Markus Heule
    // Vlad Losev
    for (const auto employee : employees.get<1>()) {
        std::cout << employee.name << std::endl;
    }

    //random_access支持operator[] at capacity reserve等接口
    //Jeff Dean
    std::cout << employees.get<1>()[0].name << std::endl;
    //Google
    std::cout << employees.get<1>().at(1).name << std::endl;

    return 0;
}
3.4. others
此外还支持global_fun User-defined key extractors Composite keys等,我用的不多,就不介绍了,感兴趣的同学可以参考boost官方文档
4. tag
可能有的同学会觉得get<N>的方式不够清晰,multi_index_container也提供了bimap里tag的方式。
例如对于上面的例子,修改EmployeeSet的定义
struct by_name_length {};

typedef boost::multi_index::multi_index_container<
    Employee,
    boost::multi_index::indexed_by<
        boost::multi_index::ordered_non_unique<
            //tag定义
            boost::multi_index::tag<by_name_length>,
            boost::multi_index::const_mem_fun<Employee, std::size_t, &Employee::name_length>,
            std::greater<std::size_t>
        >,
        boost::multi_index::random_access<>
    >
> EmployeeSet;
可以看到我们增加了一个tag叫做by_name_length
那么以下两种方式是等价的
    for (const auto employee : employees.get<by_name_length>()) {
    // for (const auto employee : employees.get<0>()) {
    }
5. updating
由于具有多个索引,更新时需要保证一致性,因此multi_index_container提供了modify modify_key replace接口
其中第一个参数为iterator,第二个参数为更新函数
employees.get<1>().modify(employees.get<1>().begin(), [](Employee& employee){ employee.name = "G"; }
或者
void foo(Animal& a) {
    a.name = "ufo";
}

x.modify(x.find('cat'), foo)
6. 不同索引的迭代器转换
不同索引间的迭代器可以通过project接口转换
typedef boost::multi_index::multi_index_container<
    Employee,
    boost::multi_index::indexed_by<
        boost::multi_index::ordered_non_unique<
            boost::multi_index::tag<by_name_length>,
            boost::multi_index::const_mem_fun<Employee, std::size_t, &Employee::name_length>,
            std::greater<std::size_t>
        >,
        boost::multi_index::random_access<>
    >
> EmployeeSet;

int main() {
    EmployeeSet employees;

    employees.insert({"Jeff Dean"});
    employees.insert({"Google"});
    employees.insert({"Bidu"});
    employees.insert({"Markus Heule"});
    employees.insert({"Vlad Losev"});

    //name_length("Google") == 6
    auto name_length_iter = employees.get<by_name_length>().find(6);
    auto iter = employees.project<1>(name_length_iter);

    for (; iter != employees.get<1>().end(); ++iter) {
        //Google
        //Bidu
        //Markus Heule
        //Vlad Losev
        std::cout << iter->name << std::endl;
    }

    return 0;
}
上面的例子里首先通过by_name_length这个索引获取长度为6的元素:{“Google”}
然后通过project接口获取另一个索引random_access对应的迭代器,然后按照插入顺序遍历直到末尾元素。
7. LRU-cache
cache的种类有很多种,其中boost例子里实现了MRU,我尝试实现了下LRU及单测,如有错误请指正,代码地址。